Blog

EFI,MBR,GPT,Bootloader

术语 #

  1. Bootloader The bootloader is the first software program that runs when a computer is booted. Its job is to load the Linux kernel and to start the init system.
  2. Boot manager When you first power on your computer, a boot manager will present you with a boot menu. If you have multiple operating systems installed, the boot manager will allow you to choose which one to boot. If a Linux distro has multiple kernels installed, the boot manager will allow you to choose which kernel to boot.
  3. BIOS The Basic Input/Output System (BIOS) is firmware that resides in a chip on a computer motherboard. It contains the basic instructions that start up a computer. After the computer is started, the BIOS will perform a Power-on Self Test (POST) to verify that the hardware is working properly. Then, the BIOS will start the bootloader. It worked well for its time but is now outdated. One problem is that it can’t deal with drives of more than two terabytes in size. I mean, if you were to install a three-Terabyte drive in a BIOS-based machine, you’d be able to use the drive, but one Terabyte of drive space would go to waste. BIOS also can’t deal with the Secure Boot feature.
  4. EFI/UEFI This was originally called the Extensible Firmware Interface (EFI), but the name was changed to Unified Extensible Firmware Interface (UEFI) for the Version 2 variant. It has replaced BIOS on newer computers. Unlike BIOS, EFI/UEFI works very well with very large drives. It also works with the Secure Boot feature.
  5. MBR There are two general categories of partition types. The Master Boot Record (MBR) type is the older type. Its main flaw is that it doesn’t work with partitions that are larger than two terabytes. Even if you have an EFI/UEFI-based machine that can work with large drives, MBR still limits you to these smaller partitions. What’s a bit confusing is that the term MBR also refers to the first 512-byte sector of a drive, which is where the bootloader gets installed on BIOS-based machines.
  6. GPT The GUID Partition Table (GPT) type of partition has replaced the old MBR type. It works well with partitions that are larger than two Terabytes. (The exact maximum partition size depends on which filesystem you’ve used to format the partition.) On EFI/UEFI machines, you need to install the bootloaders in a GPT partition instead of in an MBR. (I’ll explain why I’ve said bootloaders instead of bootloader later.)
  7. GRUB2 The Grand Unified Bootloader Version 2 (GRUB2) is currently the most popular bootloader on laptops, desktops, and servers. It works well on machines with multiple installed operating systems. It’s not part of the systemd ecosystem, but it can be used on systemd machines.
  8. systemd-boot This bootloader is part of the systemd ecosystem. It isn’t widely used just yet, but it could be someday. It’s lighter-weight and simpler to configure than GRUB2, and it also works well for machines with multiple operating systems installed.

From #

cook:journalctl

journalctl #

journalctl output is automatically piped into less.

disk usage #

journalctl --disk-usage

bootups #

journalctl --list-boots
journalctl -b
journalctl -b -p err
journalctl -b -1

-g option #

The -g option allows you to grep for either specific text strings or Perl-compatible regular expressions.

journalctl -g fail
journalctl -g Fail
journalctl -g fail --case-sensitive=true

priority levels #

0:emerge, 1:alert, 2:crit, 3:err, 4:warning, 5:notice, 6:info, 7:debug

...

Converting to cgroup version 2

Converting RHEL 8-type distros to cgroup version 2 #

It’s an easy matter to convert a Red Hat Enterprise Linux 8-type distro to cgroup Version

1.is to edit the /etc/default/grub file on your AlmaLinux machine. Find the line that starts with GRUB_CMDLINE_LINUX=. At the end of that line, add systemd.unified_cgroup_hierarchy=1. The whole line should now look like this:

GRUB_CMDLINE_LINUX="crashkernel=auto resume=/dev/mapper/vl-swap rd.lvm.lv=vl/root rd.lvm.lv=vl/swap rhgb quiet systemd.unified_cgroup_hierarchy=1"

Next, rebuild the GRUB configuration, like this:

...

Setting cpuset(systemd)

Content #

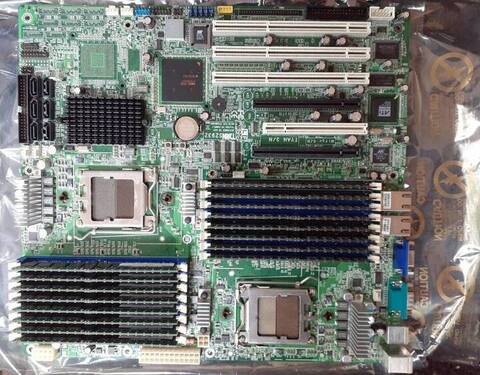
A dual-CPU motherboard There are two CPU sockets, each with its own bank of memory sockets. Each bank of memory constitutes a NUMA node.

[donnie@fedora-teaching ~]$ numactl -H
available: 2 nodes (0-1)
node 0 cpus: 0 2 4 6
node 0 size: 7959 MB
node 0 free: 6982 MB
node 1 cpus: 1 3 5 7
node 1 size: 8053 MB
node 1 free: 7088 MB
node distances:
node   0   1
  0:  10  20
  1:  20  10

By default, most processes run under a randomly chosen CPU core or set of CPU cores upon startup. Sometimes, the operating system might move a running process from one core or set of cores to another. On a normal workstation like I’m running here, that doesn’t matter. But, it might matter on a server that’s running lots of processes. You could possibly improve efficiency and performance by assigning certain processes to their own dedicated CPU cores and NUMA nodes.

...

Setting resource limits on rootless containers

Content #

Deletation under cgroup Version 2 is perfectly safe. Open the /lib/systemd/system/user@.service file:

Delegate=pids memory

By default, onn-privileged users are only allowed to set resource limits for memory and for the maximum number of running processes. Edit the Delegate= line so that it will look like this:

Delegate=pids memory io cpu cpuset

Create an Ubuntu container:

podman run -it --cpu-period=100000 --cpu-quota=50000 ubuntu /bin/bash

inspect the running container:

podman inspect container_name

Their should have something like this:

...

Controlling blkio usage(systemd)

Setting a blkio limit for a user #

  1. using iotop

    sudo iotop -o
    
  2. create 10GB file

    dd if=/dev/zero of=afile bs=1M count=10000
    

    copy this file to the /dev/null

    dd if=afile of=/dev/null
    

    check iotop

  3. limit read bandwidth ot only one MB per second

    sudo systemctl set-property user-1001.slice BlockIOReadBandwidth="/dev/sda 1M"
    
  4. do a daemon-reload

    sudo systemctl daemon-reload
    
  5. check cgroup filesystem

    cat /sys/fs/cgroup/blkio/user.slice/user-1001.slice/blkio.throttle.read_bps_device
    8:0 1000000
    

    the “8:0” represents the jamor and minor numbers of the /dev/sda device:

    ...

Controlling memory usage for user(systemd)

Content #

  1. use stress-ng with user alice

    stress-ng --brk 4
    

    System may not respond.

  2. set 1GB memory limit for alice

    sudo systemctl set-property --runtime user-1001.slice MemoryMax=1G
    

    –runtime makes the setting temporary.

From #

Controlling CPU usage for a service(systemd)

Content #

sudo SYSTEMD_EDITOR=vim systemctl edit --full --force cputest.service
sudo systemctl daemon-reload
sudo systemctl start cputest.service
sudo systemctl cat cputest
sudo systemctl set-property cputest.service CPUQuota=90%
sudo systemctl cat cputest
sudo SYSTEMD_EDITOR=vim systemctl edit --full --force cputest.service
cat /sys/fs/cgroup/cpu/system.slice/cputest.service/cpu.cfs_quota_us
90000

cputest.service文件的内容:

[Unit]
Description=CPU stress test service
[Service]
ExecStart=/usr/bin/stress-ng -c 4

From #

Controlling CPU usage for a user(systemd)

Content #

  1. stress test on four cores of the CPU

    vicky@ubuntu: stress-ng -c 4
    
  2. use top, and find user-1001.slice

  3. set property

    root@ubuntu: systemctl set-property user-1001.slice CPUQuota=10%
    

    10%的含义是指所有四核加起来不超过10%。

  4. check property

    root@ubuntu: systemctl cat user-1001.slice
    
  5. cgroup fs

    cd /sys/fs/cgroup/cpu/user.slice/usre-1001.slice
    cat cpu.cfs_quota_us
    

From #