Blog

Forms of stream specifiers

Content #

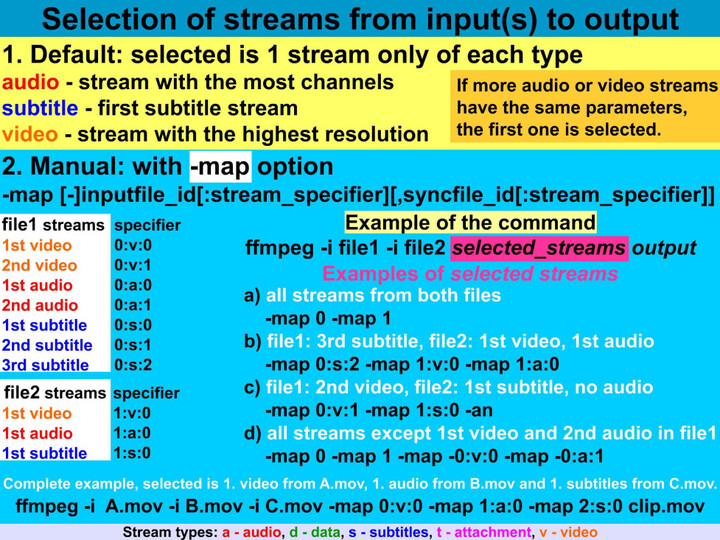
Beside the specific -map option, stream specifiers are used with many other options in several forms:

  1. stream_index selects the stream with this index (number)

  2. stream_type[:stream_index]

stream_type is 1 of letters a (audio), d (data),s (subtitle), t (attachments) or v (video); if stream_index is added, it selects the stream of this type with given index, otherwise it selects all streams of this type

  1. p:program_id[:stream_index]

if stream_index is added, then selects the stream with stream_index in program with given program_id, else selects all streams in this program

...

Selection of streams from inputs to output

Content #

文件和流和下标都是从0开始算。不使用-map,则每种类型(audio, video, subtitle)只会选出一个流。 There are some special stream specifiers:

  1. -map 0 selects all streams from all types
  2. -map i:v selects all video streams from the file with a number i (index), -map i:a selects all audio streams, -map i:s selects all subtitle streams, etc.
  3. special options -an, -vn, -sn exclude all audio, video or subtitle streams respectively

Forms of stream specifiers

From #

Link labels in filterchains and filtergraphs

Content #

In the filtergraphs can be used link labels that represent the output of a selected filterchain and can be used anywhere in the following filtergraphs. For instance we want to compare the input video with an output denoised by a hqdn3d filter. Without the filtergraphs we must use at least 2 commands, for example:

ffmpeg -i input.mpg -vf hqdn3d,pad=2*iw output.mp4
ffmpeg -i output.mp4 -i input.mpg -filter_complex overlay=w compare.mp4

Using a filtergraph with the link labels, sufficient is only 1 command:

...

Displaying Output Preview(ffmpeg)

Content #

Displaying output preview During various video tests, we can save plenty of time by displaying the command output directly on the screen and not to save it to the file and than preview it in a media player.

Preview with FFplay media player

Instead of generating a new file with ffmpeg tool using the simplified command

ffmpeg -i input_file ... test_options ... output_file

we can use the ffplay that will show exactly the same as ffmpeg saves to the file using the command

...

any_to_mp4 converter(Using ffmpeg)

Content #

# ######################################################################
# BATCH CONVERTER
#
# This script targets .avi as an input file(s) and converts into .mp4
# You can change input target from .avi to any like .mkv
# by replacing .avi to .mkv i.e INPUT_EXT=.avi to INPUT_EXT=.mkv
# ######################################################################
# Checking if ffmpeg is installed.
ffmpeg=`which ffmpeg`
ffprobe=`which ffprobe`
EXITCODE=101

if (test ! -n "$ffprobe");
then
clear
echo
echo "********************************"
echo "* You have to install ffprobe. *"
echo "********************************"
echo
exit "$EXITCODE"
fi

if (test -n "$ffmpeg");
then

# Specify input and output file extensions
INPUT_EXT=.avi  # extension .avi can be replace with any valid video extension like .mkv
OUTPUT_EXT=.mp4

# Specify input and output directories.
# "/path/to/some/directory"
# Here input and output directory is `pwd` or "${PWD}" -> Current Directory.

INPUT_DIR=`pwd` # "$(PWD)" can be replaced with "/path/to/input/directory"
OUTPUT_DIR=`pwd` # "$(PWD)" can be replaced with "/path/to/output/directory"

# Counting total files for encoding.
# If count is zero then nothing to do!

COUNT=`ls -l "$INPUT_DIR/"*"$INPUT_EXT" | grep ^- | wc -l`
echo
echo "Total $COUNT file(s) to encode ..."
echo

if [ "$COUNT" -gt 0 ];
then

for f in "$INPUT_DIR/"*$INPUT_EXT; do

  INPUT_FILE="$f" ; OUTPUT=`basename "$f"`
  OUTPUT_FILE="$OUTPUT_DIR/${OUTPUT%$INPUT_EXT}$OUTPUT_EXT"
  ## USING ffprobe TO GET MEDIA INFORMATION
  resolution=`ffprobe -v error -select_streams v:0 -show_entries stream=height,width -of csv=s=x:p=0 "$INPUT_FILE"`
  frame_rate=`ffprobe -v error -select_streams v:0 -show_entries stream=avg_frame_rate -of default=noprint_wrappers=1:nokey=1 "$INPUT_FILE"`
  aspect=`ffprobe -v error -select_streams v:0 -show_entries stream=display_aspect_ratio -of default=noprint_wrappers=1:nokey=1 "$INPUT_FILE"`
  channels=`ffprobe -v error -select_streams v:1 -show_entries format=nb_streams -of default=noprint_wrappers=1:nokey=1 -sexagesimal "$INPUT_FILE"`
  ## USING ffmpeg to COVERT
  echo
  echo "Now encoding file: " $INPUT_FILE
  ffmpeg -i "$INPUT_FILE" -codec:v libx264 -crf 21 -bf 2 -r "$frame_rate" -s "$resolution" -aspect "$aspect" -flags +cgop -pix_fmt yuv420p -codec:a aac -b:a 256k -r:a 48000 -ac "$channels" -movflags faststart "$OUTPUT_FILE"
  wait

done

else
echo "File with "$INPUT_EXT" extension does not exist."

fi

echo
echo "Total "$COUNT" file(s) has been encoded."
echo

else
clear
echo
echo "********************************"
echo "* You have to install ffmpeg. *"
echo "********************************"
echo
fi

exit 0

From #

show_entries(ffprobe)

ffprobe show_entries #

show_entries section_entries #Set list of entries to show.
  1. section_entries contains a list of section entries separated by :.
  2. Each section entry is composed by a section name (or unique name), optionally followed by a list of entries local to that section, separated by ,.

If section name is specified but is followed by no =, all entries are printed to output, together with all the contained sections. Otherwise only the entries specified in the local section entries list are printed. In particular, if = is specified but the list of local entries is empty, then no entries will be shown for that section.

...

发生超时重传后拥塞窗口的变化

Content #

重传之后的拥塞窗口是否需要调整呢?

非常有必要,为了不给刚发生拥塞的网络雪上加霜,RFC建议把拥塞窗口降到1个 MSS,然后再次进入慢启动过程。

这一次从慢启动过渡到拥塞避免的临界窗口值就有参考依据了。RFC5681认为应该是发生拥塞时没被确认的数据量的1/2,但不能小于2个MSS。

比如说发了19个包出去,但只有前3个包收到确认,那么临界窗口值就被定为后 16个包携带的数据量的1/2。

From #

Wireshark网络分析就这么简单

RTO(Retransmission Timeout)

Content #

拥塞之后会发生什么情况呢?对发送方来说,就是发出去的包不像往常一样得到确认了。不过收不到确认也可能是网络延迟所致,所以发送方决定等待一小段时间后再判断。假如迟迟收不到,就认定包已经丢失,只能重传了。这个过程称为超时重传。如图所示,从发出原始包到重传该包的这段时间称为RTO。

From #

Wireshark网络分析就这么简单

平时感觉不到拥塞的原因

Content #

无论是慢启动还是拥塞避免阶段,拥塞窗口都在逐渐增大,理论上一定时间之后总会碰到拥塞点的。那为什么我们平时感觉不到拥塞呢?

  1. 操作系统中对接收窗口的最大设定多年没有改动,比如 Windows 在不启用“TCP window scale option”的情况下,最大接收窗口只有64KB。而近年来网络有了长足进步,很多环境的拥塞点远在64KB以上。也就是说发送窗口已经被限制在64KB了,永远触碰不到拥塞点。

  2. 很多应用场景是交互式的小数据,比如网络聊天,所以也不会有拥塞的可能。

  3. 在传输数据的时候如果采用同步方式,可能需要的窗口非常小。比如采用了同步方式的 NFS 写操作,每发一个写请求就停下来等回复,而一个写请求可能只有4KB。

  4. 即便偶尔发生拥塞,持续时间也不足以长到能感受出来,除非抓了网络包进行数据分析、对比。

From #

Wireshark网络分析就这么简单